LogCheck Installation
- Q: dBASE Runtime will not install
- Q: LogCheck will not install
- Q: LogCheck installs, however, it informs me that Java runtime is not installed
Starting LogCheck
- Q: How do I start LogCheck ?
- Q: LogCheck will not start and it tells me that it could not load PLUSRUN.EXE
- Q: LogCheck will not start and tells me either that “Trial period expired” or “Please plug the LogCheck dongle into a USB port”
Running LogCheck
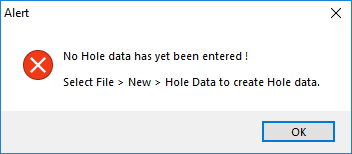
- Q: LogCheck starts but when File > Open > Hole Data is selected it informs me that “No Hole data has yet been entered !” even though there is LogCheck data on my machine or server
- Q: LogCheck opens but when File > New > Hole Data or File > Open > Hole Data is selected, it tells me that it needs a dictionary
- Q: LogCheck opens data but does not allows me to enter a code value telling me that the code I have entered is an invalid code for that particular column for that particular data type
- Q: I am able to plot a Geology profile but how do I also show the Las data on the plot
- Q: I have generated my plot, how do I view it, plot it and create a .pdf copy of it
- Q: How do I use the Graphical Editor to adjust my Geology to my geophysics
- Q: The Graphical Editor will not start
Q: dBASE Runtime will not install
A: If the dBASE Runtime installation will not install and you receive the following message:
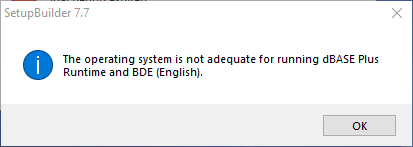
You need to first set the compatibility on the dBASE Runtime installation program. To do this find where the file (PlusRuntime-b2215_EN.exe) has been downloaded to and then right click on the file and the following menu will appear:
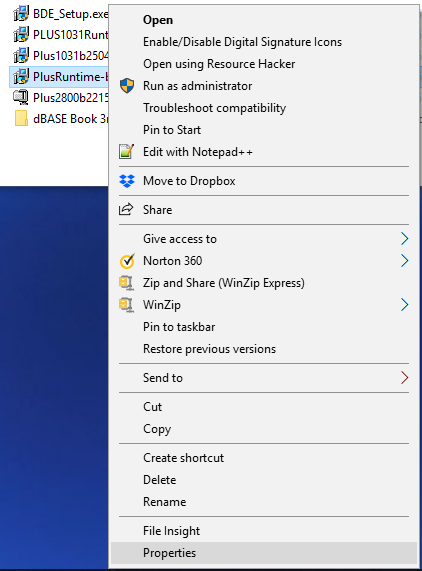
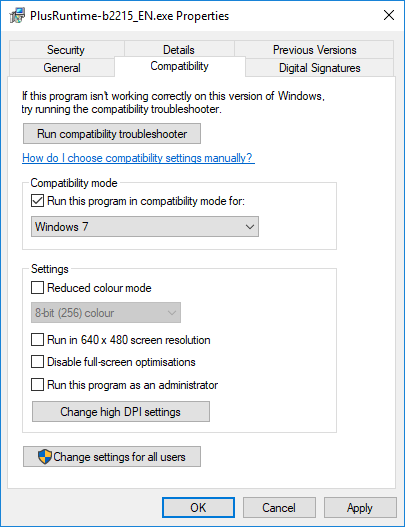
Next select Properties on this menu and the following Window will appear:

Next select the Compatibility tab at the top of the Window:
Q: LogCheck will not install.
And the following message appears when you attempt to install LogCheck:

A: LogCheck uses a stripped down version of dBASE called dBASE Runtime to handle its database functionality. This must be installed before LogCheck can be installed and this message indicates that it has not been installed.
The dBASE Runtime installation file can be downloaded by clicking on the link:
(Note: if typing this address into your browser that there is an underscore between the b2215 and the EN in this address). After downloading this file it must be run to install the dBASE Runtime.
Note that the dBASE website has numerous releases of the dBASE Runtime, it is crucial that you download the one that is found at the above link rather than any of the others on the dBASE website as the version of Runtime must match the version of dBASE that was used to build the LogCheck program.
Q: LogCheck installs, however, it informs me that Java runtime is not installed:
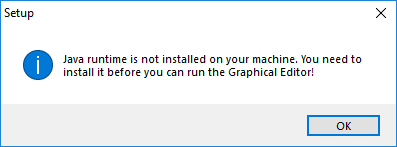
A: The copy of LogCheck that you are using includes the LogCheck Graphical Editor. This component needs you to have the Java runtime installed on your computer before it will run.
This can be downloaded for free from the link:
https://www.java.com/download/
and must be downloaded and installed before the Graphical Editor can be used in LogCheck.
Q: How do I start LogCheck ?
A: If you selected Create a desktop icon during the installation process:
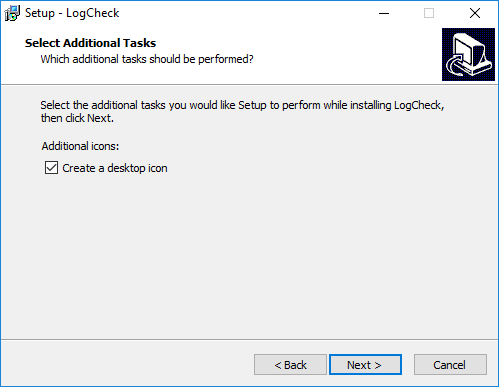
Then the following icon will appear after the installation on your DeskTop:

Double click on this icon to start LogCheck.
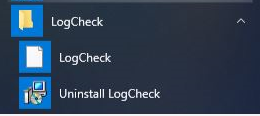
If you did not select Create a desktop icon during installation, open the start menu and scroll down to the LogCheck folder and then select LogCheck form this folder:
Q: LogCheck will not start and it tells me that it could not load PLUSRUN.EXE:
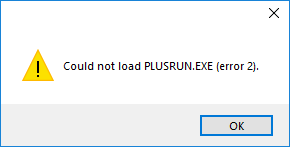
A: LogCheck uses a stripped down version of dBASE called dBASE Runtime to handle its database functionality. This must be installed before LogCheck can be installed and this message indicates that it has not been installed.
The dBASE Runtime installation file can be downloaded by clicking on the link:
https://www.dbase.com/downloads/PlusRuntime-b2215_EN.exe
(Note: if typing this address into your browser that there is an underscore between the b2215 and the EN in this address). After downloading this file it must be run to install the dBASE Runtime.
Note that the dBASE website has numerous releases of the dBASE Runtime, it is crucial that you download the one that is found at the above link rather than any of the others on the dBASE website as the version of Runtime must match the version of dBASE that was used to build the LogCheck program.
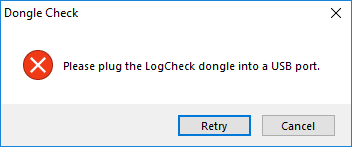
Q: LogCheck will not start and tells me either that “Trial period expired” or “Please plug the LogCheck dongle into a USB port.”:
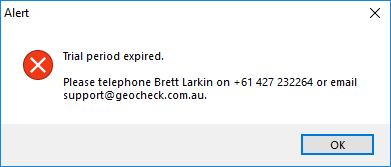
A: To stop users from running illegal copies of LogCheck, the program uses two different forms of security. Every copy uses just one of these two methods:
- The user is supplied with an installation file containing an expiring copy of LogCheck. Any LogCheck installed by this type of file will expire after a set date, usually three months after the installation file was created. If the user needs to continue running LogCheck after this date they need to obtain a new LogCheck installation file from GeoCheck and re-install the software.
- The user is supplied with an installation file containing a copy of LogCheck that never expires but requires a dongle. Any installation with this type of file will only operate if you plug a LogCheck dongle into one of your USB ports. To obtain one of these please contact GeoCheck.
If you getting the message to plug in the LogCheck dongle but the dongle is actually plugged in then this can have two possible causes:
- There is no driver for the dongle currently installed on the computer. Windows is meant to automatically install the driver the first time that it is plugged into the computer, however, in order to do this the computer needs to be connected to the internet at the time the dongle is first plugged in.
- The dongle has a hardware fault.
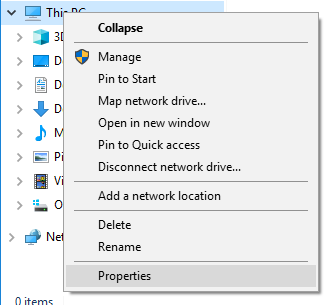
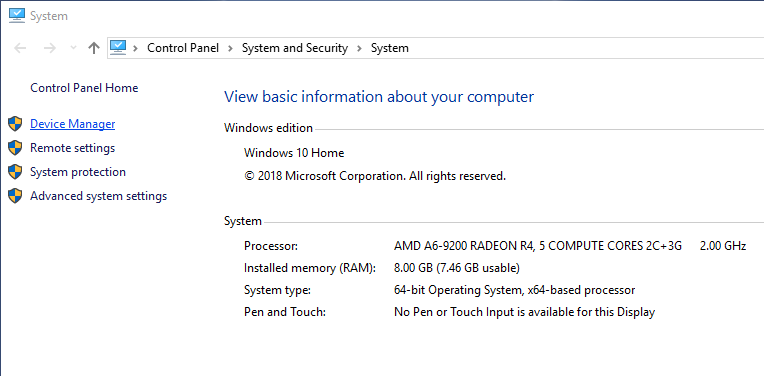
You can determine which of these is the problem by plugging in the dongle and then going to Windows Explorer and right clicking the icon for This PC and then selecting Properties from the menu that appears:
Then select Device Manager from the menu on the left of the Window that appears:
The following Window will then appear:
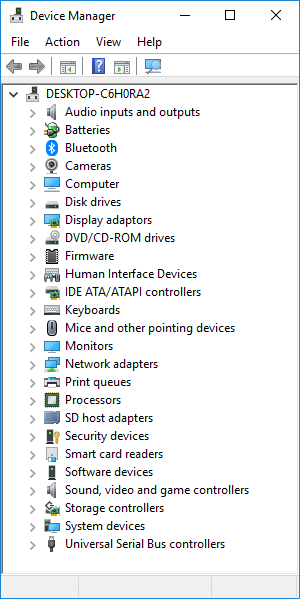
At the bottom of this Window, there is an item named Universal Serial Bus controllers, click on the > sign next to it and a set of sub items will appear:
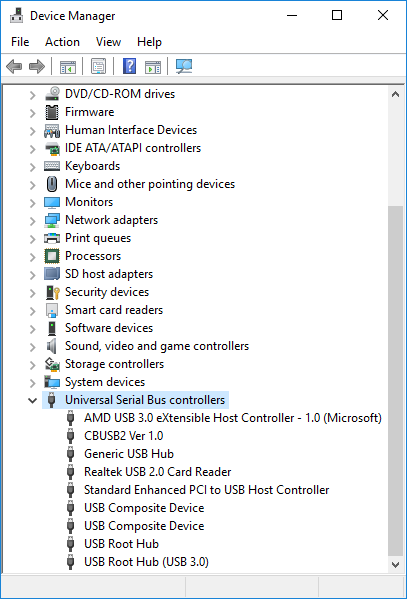
If there is an item in this sublist named CBUSB2 Ver 1.0 then the driver is installed and it is a fault in the dongle, if not then the driver needs to be installed.
If it is a hardware fault then please contact GeoCheck to arrange a free replacement dongle.
If the driver is not installed and the computer is not connected to the internet, connect the computer to the internet and then unplug the dongle and plug it in again. If this does not work or the computer was already connected to the internet, run the program CBUSBAT.bat. After LogCheck has been installed, this program can be found in the folder C:\Program Files (x86)\LogCheck\Bin.
Q: LogCheck starts but when File > Open > Hole Data is selected it informs me that “No Hole data has yet been entered !” even though there is LogCheck data on my machine or server:
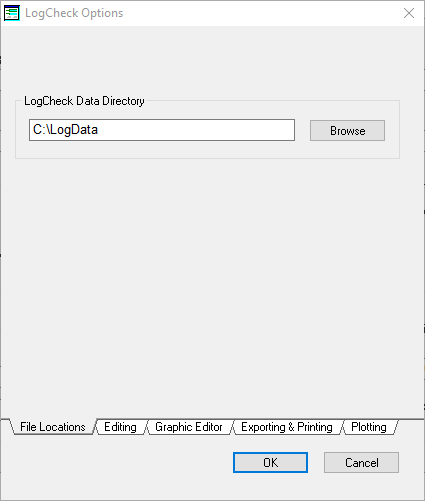
A: When you started LogCheck you probably had the prompt:
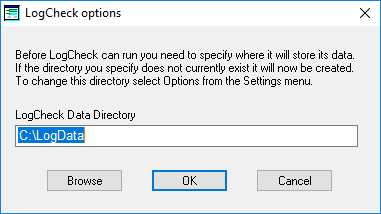
The folder name that you have entered is not the one where your LogCheck data is stored. To change it to the correct folder, from the LogCheck menu select Settings > Options and then under LogCheck Data Directory enter the name of the folder which contains your LogCheck projects. Note that this is not your actual Project folder but the folder in which your Project folder is contained. If accessing a server ensure that the name of the LogCheck Data Directory matches absolutely exactly the name as entered on other computers that are currently having no problem accessing the LogCheck data on the server.
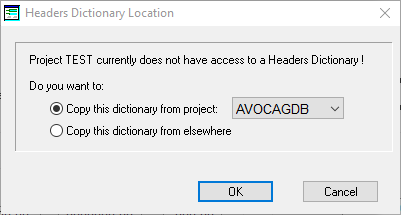
Q: LogCheck opens but when File > New > Hole Data or File > Open > Hole Data is selected, it tells me that it needs a dictionary:
Note that you should only be receiving this message if you are a non-CoalLog LogCheck user as when you install the CoalLog versions of LogCheck, the standard CoalLog dictionaries are also installed onto your computer for use by LogCheck.
A: You cannot enter or read data in LogCheck without there being a dictionary for the required data type already loaded onto your machine. If you are working on a project that already has data in LogCheck or in an organization with multiple projects in LogCheck you should obtain the dictionary used by others and copy it into the appropriate folder on your computer.
LogCheck dictionaries consist of two files which have a filename of whatever the data type is plus the word Dictionary. One of these files has a file extension of .dbf and the other a file extension of .mdx and so for example the two files for a Header data type dictionary have the names Headers Dictionary.dbf and Headers Dictionary.mdx. When LogCheck searches for the dictionary for a data type, it first looks in the folder that contains the user’s data for that data type for that project and if it does not find a dictionary there it looks in the folder called Dictionaries in LogCheck’s data directory. For example, if LogCheck’s data directory is called c:\LogData and the name of the user’s project is AVOCAGDB, LogCheck will look firstly in the folder c:\LogData \AVOCAGDB\Headers for the dictionary files and if it does not find them there it will look for them in the folder c:\LogData\Dictionaries. If it does not find them in either place then it asks with the above prompt where to copy them from.
The other options available to the user for obtaining a dictionary is to create one from scratch or to obtain one from another computer program. To establish one from scratch, you first need to set yourself to Manager. To do this select Settings > Manager from the LogCheck menu and then enter the Manager password which will be logcheck (not case sensitive) until someone changes it. Then select File > New > Dictionary from the LogCheck menu. You will then need to select File > Open > Dictionary and select a dictionary category in order to enter values in the dictionary.
Dictionaries can also be imported into LogCheck from Excel, Vulcan, MineScape or Minex. To do this, once again set yourself to Manager (see above) and then select File > Import > Dictionary.
Q: LogCheck opens data but does not allows me to enter a code value telling me that the code I have entered is an invalid code that particular column for that particular data type:
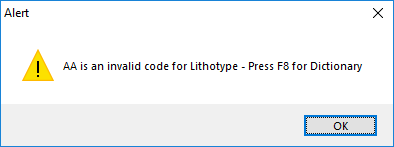
A: As suggested by error message, you should press F8 to see what codes are available for that column. These will be displayed on the side of your screen.
No Dictionary Codes for any column in the data
If there are no codes shown for the field and then you move to any other field and there are no codes shown then this means that you do have a dictionary for the data type but it is empty. This can occur if you have accidently created a new dictionary in your project when the dictionary you require is sitting in the Dictionaries folder or is the Standard CoalLog dictionary that comes with LogCheck. To get your dictionary back, you must exit out of LogCheck and from Windows Explorer delete the accidently created dictionary.
LogCheck dictionaries consist of two files which have a filename of whatever the data type is plus the word Dictionary. One of these files has a file extension of .dbf and the other a file extension of .mdx and so for example the two files for a Header data type dictionary have the names Headers Dictionary.dbf and Headers Dictionary.mdx. When LogCheck searches for the dictionary for a data type, it first looks in the folder that contains the user’s data for that data type for that project and if it does not find a dictionary there it looks in the folder called Dictionaries in LogCheck’s data directory. For example, if LogCheck’s data directory is called c:\LogData and the name of the user’s project is AVOCAGDB, LogCheck will look firstly in the folder c:\LogData \AVOCAGDB\Headers for the dictionary files and if it does not find them there it will look for them in the folder c:\LogData\Dictionaries. If it does not find them in either place then it asks with the above prompt where to copy them from.
Dictionary Codes exist but not yours
You need to edit the dictionary. To do this you will need to set yourself to Manager by selecting Settings > Manager from the LogCheck menu and then entering the Manager password which will be logcheck (not case sensitive) until someone changes it. Then select File > Open > Dictionary from the LogCheck menu and select the data type and dictionary category that you want to edit.
CoalLog Users Only
There are only a limited number of fields where the user is permitted to add in codes and the data remains CoalLog compliant. These are:
Header Data: Lease No, Survey Company, Geological Organization, Geophysical Company
Drilling Data: Drilling Company, Rig No, Rig Type
Geology Data: Horizon, Seam, Ply
Sample Dispatch: Laboratory
If adding codes into these categories into your dictionary you should first check if there are already codes allocated in CoalLog for the items that you would like to add. Check the file CoalLog v2.1 Reference Items Dictionaries.pdf.
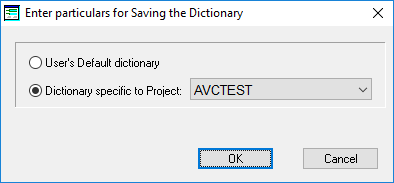
Once you have edited the standard CoalLog dictionary, LogCheck will not allow you to overwrite the original standard dictionary and so you will need to save the dictionary as either a User’s Default dictionary or into a specific project:
Seam Dictionary Users (this includes all LogCheck CoalLog users)
If you are adding Horizons, Seams, Strats or Plies you will need to do this in the Seams Dictionary not the Geology Dictionary. For non-CoalLog users, there is no specific Horizons category and so Horizons need to be added into the Seam category with a value put in the Group column of HORIZ. For CoalLog users, Horizons are entered into their own separate category. Both Seams and Strats are entered into the Seam Category of the Seams Dictionary and it is necessary to distinguish them from each other by entering either SEAM or STRAT in the Group column for each entry.
Q: I am able to plot a Geology profile but how do I also show the Las data on the plot
LogCheck only plots the data you currently have open on the screen. Therefore, to plot your Geology data you need to open it up (File > Open > Hole Data) and then plot it (File > Plot). Similarly, to plot your Las data you need to open it up and plot it. When plotting data, LogCheck prompts you for the name of the file to plot it to. This file is an AutoCAD .dxf with a filename of the name of the hole (or section) you are plotting. If the file already exists LogCheck will display a prompt like:
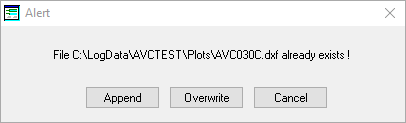
To show the Las data on the same plot as your Geology data, you need to plot it to the same file name as your Geology and then when this prompt appears select Append not Overwrite.
Q: I have generated my plot, how do I view it, plot it and create a .pdf copy of it.
A: AutoCAD .dxf files can be viewed, plotted and .pdf copies generated from it by installing the freeware produced by AutoCAD called TrueView. This can be downloaded from
The GeoCheck document Using TrueView to View and Plot LogCheck dxf files.pdf explains how to use TrueView to display, plot and generate .pdf files form your plot file. To generate a .pdf file you will also need a pdf writer such as the freeware PrimoPdf which can be downloaded from https://www.primopdf.com/
Q: How do I use the Graphical Editor to adjust my Geology to my geophysics.
A: You first open the Geology data you wish to modify by selecting File > Open > Hole Data and then select Tools > Graphic Editor. If the Graphic Editor option is greyed out it means that the copy of LogCheck you are using does not include the Graphical Editor option, you do not have Geology data open on your screen or you do not have the entire hole open but only part of the hole.
Before you can run the Graphical Editor though you need to first have an appropriate Graphical Editor Definition on your computer. This Definition tells the Graphical Editor what Las curves you wish to display, where on the screen to display it, the scale and colour for each curve and whether you want the curve first filtered:
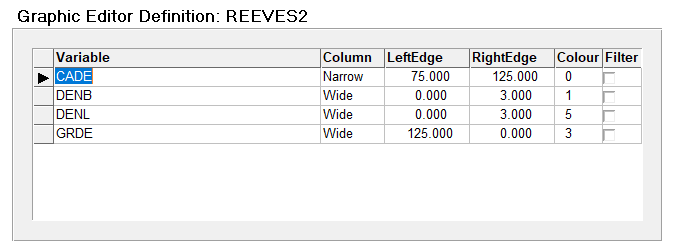
Graphical Editor Definitions consist of a single .dbf file with the file name same as the definition name. Those specifically for a particular project can be found in the folder Definitions\GraphEditPara in the particular project, for example the Graphic Editor Definitions for a project named AVOCALOG may be found in a folder named c:\LogData\AVOCALOG\Defitnions\GrphEditPara. The user’s default definitions can be found in the folder Definitions\GraphEditPara in their LogCheck data folder, for example c:\LogData\Definitions\GraphEditPara.
You can either obtain an appropriate Graphical Editor Definition from a colleague or you can create your own by selecting File > New > Definition > Graphic Editor.
Q: The Graphical Editor will not start.
A: There can be two reason for this:
The Graphical Editor requires you to have Java Runtime installed on your computer. If it is not installed you will receive one of the following messages:
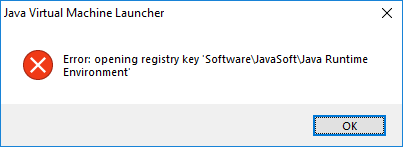
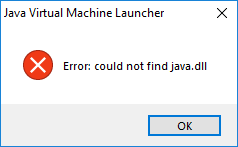
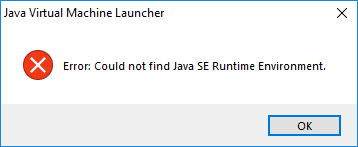
To fix this problem you need to close LogCheck and install Java Runtime. This can be downloaded for free from the link:
https://www.java.com/download/
- There is a bug in LogCheck or the Graphical Editor, in which case a message similar to the following will appear:
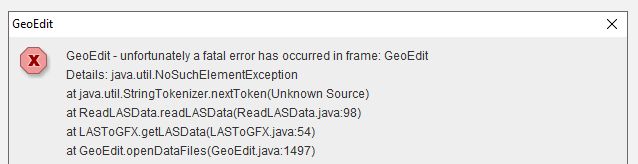
In this case please contact LogCheck support for further assistance.